내 설정을 실행하는 것은 늦은 밤 많은 사람들과 함께 재미있는 여행이었습니다. 나는 몇 명의 새로운 온라인 친구를 사귀었고 이전에 간 사람들의 경험을 활용했습니다. 즐거운 라이딩이었습니다. 이 가이드는 라이드를 다시 만들지 않습니다.
단계별 설정 AMD Radeon Vega 56/ Vega 64 – 이 가이드는 내가 찾은 것을 요약하고 거기에 도달하는 데 필요한 세부 정보를 단계별로 통합합니다. 많은 경우 이 정보는 저에게서 비롯된 것이 아닙니다. 그러나 나를 위해 일한 모든 링크와 함께 사용할 수 있는 참조를 찾지 못했습니다. 모든 세부 정보가 한 곳에 있습니다. 즐기다. 행운을 빕니다! YMMV를 기억하십시오.
1. 목표
강력한 Vega 광부를 안정적으로 시작할 수 있는 스크립트가 있는 헤드리스 컴퓨터를 사용하십시오. 아니 와트먼. 벗겨지기 쉬운 HBCC가 없습니다. 시스템을 시작하고 실행하면 CPU, Nvidia GPU 및 AMD(Vega) GPU로 해싱됩니다. 설정 자체는 Vega "해시 드롭" 문제를 모니터링하고 해결하므로 다른 작업에 집중할 수 있습니다. 이 장비는 모든 컴퓨터나 전화에서 웹 인터페이스를 통해 상태를 확인할 수 있는 기능을 제공합니다. 참고:이것은 주로 Vega 광부이므로 물론 초점은 Cryptonight 통화(예:Monero, ETN, ITNS, SUMO, KRB, XLC, Nicehash Cryptonight…)입니다.
<노인덱스>
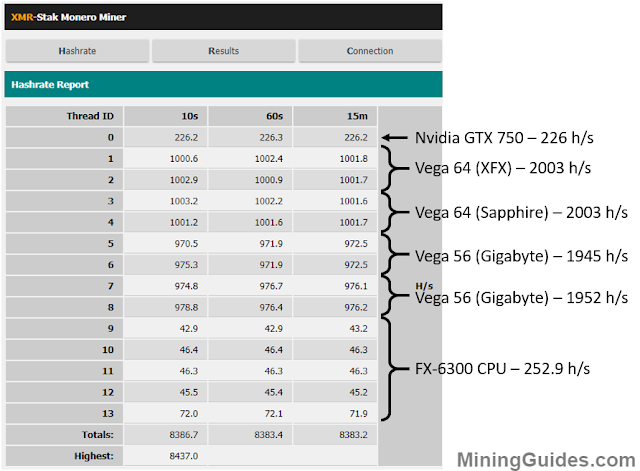
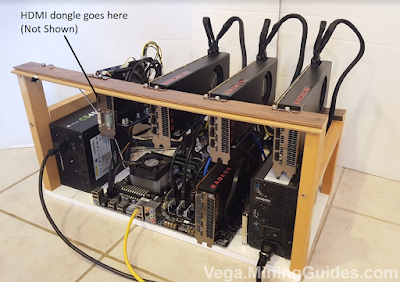
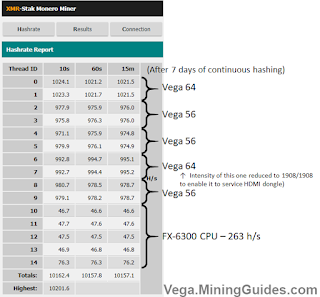
참고: 위의 그래픽은 내 원래 게시물에서 가져온 것이지만 더 이상 내 채굴 장비를 완전히 정의하지 않습니다. 이제 두 개의 장비가 있습니다. 하나는 5 Vega 광부입니다(2x). 및 3x ). 두 번째에는 두 개의 Vega가 있습니다(둘 다 ), 구형 GTX-750 1개 및 3개 . 위의 그래픽은 XMR-Stak 채굴기의 이전 버전에서도 가져온 것입니다. 새 버전의 XMR-Stak(2.2)은 에서 볼 수 있듯이 64(2040h/s)에서 더 나은 해시율을 제공합니다. .
2. 장비 및 소프트웨어
내 장비에 사용된 장비는 다음과 같습니다. 이 가이드를 사용하기 위해 동일한 장비를 사용할 필요는 없습니다. 아래 목록에는 필요한 항목을 찾는 데 도움이 되는 세부 정보가 포함되어 있습니다.
이 있는 전원 공급 장치 사용 전력
참고: 각 Vega는 2개의 를 사용합니다. 사이. Amazon 사진에는 표시되지 않았지만 4x Vega's()에 대한 브레이크아웃과 함께 제공된다는 점에 기쁘게 놀랐습니다. ).
금은 높은 평가를 받았으며 종종 더 나은 가격을 제공합니다.
EVGA는 중요한 경우 소프트웨어 모니터링을 제공하지 않습니다.
업데이트: 을 통해 이미 소유한 450w PSU를 나중에 추가했습니다. 마더보드 및 Nvidia에서 끌어오는 전력을 분산하고 사용률을 80% 미만으로 낮추기 위해( 참조) 자세한 내용)
어떤 사람들은 2배 를 권장합니다. PSU의. 이 경로를 사용하는 경우 를 미리 계획해야 합니다. . 다음은 입니다. 버전.
을 사용했습니다. 내 오래된 GTX-750에 전원을 공급하기 위해
마더보드/CPU:Gigabyte ATX GA-970A-D3P 및 FX-6300 – 이미 사용 중입니다. …
이 있습니다.
6 GPU 장비: / (이것은 내 두 번째 장비의 MB입니다)
8 GPU 장비: /
12 GPU* 장비: /
*MB를 구입하려는 경우 AMD 드라이버가 한 장비에서 8개 이상의 Vega를 지원하지 않는다는 점을 이해하십시오. 모든 에 사용해야 합니다. .
필수는 아니지만 일부에서는 iGPU를 지원하는 마더보드를 메인 모니터로 사용하면 안정성에 도움이 된다고 보고했습니다(내 Nvidia를 사용하는 방식과 유사)
(이미 가지고 있기 때문에 16GB만 사용했습니다)
하드 드라이브( 권장) 그러나 "이전" 디스크 스타일 드라이브도 작동합니다.
PCIe 라이저(저는 이 있습니다. 그리고 다른 것을 위해 돌아가야 했습니다.. 을 얻으세요 )
(Vega를 혼동하지 않고 모니터를 분리할 수 있도록)
을 사용합니다. 내 Vega에서 iGPU를 사용하는 경우 이 필요할 수 있으므로 마더보드를 확인하십시오. .
– 컴퓨터가 켜지도록 하려면 버튼이 필요합니다.
:나는 나무로 내 것을 지었지만 어떤 사람들은 그것을 구입하는 것이 덜 번거롭다고 생각합니다.
2x
사파이어 하나와 XFX 하나가 있습니다. 모든 Vegas AMD 참조 카드는 동일하므로 브랜드가 성능에 영향을 미치지 않습니다. 현재 After Market Vegas가 시장에 출시되고 있으며 아직 모든 것을 말할 수는 없습니다.
애프터 마켓 ASUS AMD Radeon RX VEGA 64 ROG Strix OC가 이 가이드와 함께 작동한다는 것을 확인했습니다.
2x
내 것은 기가바이트지만 참조 카드의 경우 브랜드는 중요하지 않습니다.
Vega 56은 ~3% 더 낮은 해시율을 제공하지만 더 저렴한 가격으로 얻을 수 있다면 60h/s 손실은 비용과 전력 절약으로 정당화될 수 있지만 최근에는 훨씬 저렴하지 않습니다 가용성이 핵심 요소입니다.
0x
(참고: 저는 개인적으로 Frontier Edition을 사용하지 않았지만 옵션입니다. 그들은 수익성 있는 Sumokoin 및 Haven 프로토콜에 사용된 'cryptonight Heavy' 알고리즘에서 2100h/s 이상 해시하는 것으로 입증되었습니다... 표준 cryptonightV7의 경우 처럼 해시합니다. 약간 까다로울 수 있습니다. 가입 FE 질문이 있는 경우. )
Nvidia GTX 750 – 이미 사용 가능(Vega 제품이 아니어도 됨)
적은 투자로 시작하려면 이 될 수 있습니다. 기술을 배우는 동안 만을 채우는 방법.
소프트웨어
이상('2018년 4월, 버전 1803' 정상 작동) (64비트)
가 있는지 확인하세요. 디지털 다운로드를 받는 경우(저는 다운로드하지 않았으며 다시 돌아가야 했습니다)
(무료) / 64비트 / 8월 23일 릴리스(드라이버만 설치, 소프트웨어 없음)
(무료)
(무료)
(무료) – Google 제공(너무 쉽고 안정적이어서 작동함)
를 사용하지 마십시오. . 일부 응용 프로그램에 대한 훌륭한 무료 프로그램이라고 확신하지만 빠른 Vega 마이닝에서는 제대로 작동하지 않습니다(테스트 시 성능 문제를 강제하는 데 사용하는 프로그램입니다).
3. 카드 설치 및 배치
내 마더보드에는 2개의 전체 16x 길이 PCI 슬롯과 3x 짧은 PCIe 슬롯이 있습니다(사용자는 다를 수 있음). iGPU가 없으면 CPU에 가장 가까운 긴 PCI 슬롯이 기본 GPU가 됩니다(CPU에 더 가까운 짧은 PCIe 슬롯이 있을 수 있지만 긴 PCI 슬롯이 기본 GPU입니다). 장비에 비 Vega GPU가 포함될 경우 첫 번째 긴 16x 슬롯에 넣는 것이 도움이 됩니다(를 통해 가능). ). 제 경우에는 GTX-750(PCIe 라이저를 통해)을 얻습니다.
보시겠지만 컴퓨터를 시작할 때마다 각 Vega가 "비활성화"되었다가 "다시 활성화"되기 때문에 유용합니다. 컴퓨터가 디스플레이에 사용하는 디스플레이를 비활성화할 필요가 없을 때 작업이 더 원활해집니다. 메인 PCI 슬롯에 안정적인(비활성화할 필요가 없는) 카드가 있으면 속 쓰림을 줄일 수 있습니다. 사람들은 항상 100% Vega로 시스템을 실행하므로(사실 저도 지금 해본 경험이 있습니다) 이것이 유일한 방법은 아닙니다(Nvidia 카드가 필요하지 않음)… 시스템에 비 Vega GPU가 있습니다.
시스템이 설정되면 메인 GPU(제 경우에는 GTX-750)에 들어갈 것입니다(설정 중에 모니터를 사용했기 때문에 이전 단계에서는 플러그가 설치되지 않았습니다). 다른 카드에는 플러그가 필요하지 않습니다. 바로 "기본"입니다. 컴퓨터는 모니터가 꺼져 있는지 또는 연결되어 있지 않은지 알 수 있을 만큼 똑똑하지만 Windows가 모니터를 절전 모드로 전환하지 않도록 설정을 변경할 것입니다. 우리는 하루 24시간 에너지를 낭비하고 싶지 않기 때문에 HDMI 더미 플러그를 사용하여 컴퓨터를 행복하게 만듭니다.
<노인덱스>
Vega 설치 순서는 중요하지 않습니다. MB의 PCIe 슬롯은 모든 슬롯을 사용하려면 라이저를 사용해야 하므로(또는 카드가 하나 이상의 슬롯을 덮음) 간격이 있습니다. 예외는 최종 16xPCI 위치(CPU에서 가장 멀리 떨어져 있음)입니다. 내 카드가 방해할 수 있는 오른쪽에 아무것도 없기 때문에 라이저 없이 해당 슬롯을 직접 사용할 수 있었습니다. CPU에 가까운 슬롯부터 시작하여 Vega 64, GTX-750(라이저를 통한 16x 슬롯), Vega 56, Vega 56, Vega 64(라이저 없이 MB 16x PCI 슬롯에 직접 장착)를 주문했습니다.
<노인덱스>
4. 일반 Windows 설정:
참고: 원래 내 가이드는 Windows 설치/드라이버 제거에 대해 자세히 설명하지 않았지만 이 기초가 나중에 많은 사람들이 문제를 해결하는 데 도움이 되는 것을 발견하여 세부 정보를 추가했습니다.
를 권장합니다. Windows 10(새로 시작할 필요는 없습니다... 하지만 저는 했습니다).
새 설치를 시작하기 전에 전원이 꺼진 상태에서 다음을 수행하십시오.
"카드 설치 및 배치"에 따라 모든 카드를 물리적으로 설치
"카드 설치 및 배치"에 따라 적절한 카드에 모니터를 연결합니다.
설치 미디어로 컴퓨터를 부팅하고 새로 설치합니다.
Fall Creators Update 이상이 있을 때까지 Windows 업데이트를 강제 실행
참고:이 가이드는 "버전 1709, 빌드 16299"로 업데이트되었지만 두 시스템 모두 현재 문제 없이 2018년 4월 버전(버전 1803)을 실행하고 있으므로 "또는 그 이상"으로 두겠습니다. 가이드 변경이 필요한 업데이트가 발생할 때까지.
(이 업데이트가 없는 한 사람들은 3개 이상의 Vega에 대한 문제를 보고했습니다)
Windows 시작 버튼에서 "업데이트 확인"을 입력하고 "업데이트 확인"을 선택합니다.
"최신 상태"라고 표시될 때까지 Windows를 재부팅할 때마다 이 단계를 반복합니다.
기다려라... 정말 참아라... 전체 프로젝트에서 가장 느린 부분일 수 있음
명령 프롬프트를 열고 "winver"를 입력합니다. "Build 16299" 이상이라고 표시되는지 확인합니다.
(선택 사항) 만들기 "Fall Creators Update"라는 포인트(오래 걸리지 않음)
권장된 새 Windows 설치를 수행한 경우 "로 이동합니다. "
guru3d.com 다운로드 및 설치 DDU
다운로드 링크는 웹페이지 하단 근처에 있습니다. 가벼운 프로그램입니다.
Windows를 새로 설치하지 않은 경우 다음 단계는 이전 드라이버를 제거하고 카드를 적절한 위치로 이동하는 과정을 안내합니다.
iGPU가 있는 경우 이동하지 않으므로 제거할 필요가 없습니다.
현재 위치에 유지될 Nvidia가 있는 경우 해당 드라이버를 제거할 필요가 없습니다. 제거 및/또는 이동되는 경우:
안전 모드에서 컴퓨터를 다시 시작합니다( )
DDU를 실행합니다. 오른쪽 상단에서 "Nvidia"를 선택한 다음 전원을 끈 후 카드를 물리적으로 제거할 수 있도록 종료(다시 시작)하도록 합니다.
이전에 AMD 드라이버를 설치하려고 시도했거나 Vega의 물리적 위치를 이동해야 하는 경우:지금이 제거할 때입니다
안전 모드에서 컴퓨터를 다시 시작합니다( )
DDU를 실행합니다. 오른쪽 상단에서 "AMD"를 선택한 다음 전원을 끈 후 물리적으로 카드를 섞을 수 있도록 종료(재시작과 비교)합니다.
알겠습니다. 컴퓨터의 전원이 꺼져 있고 필요에 따라 구성할 수 있습니다.
“에 따라 모든 카드를 물리적 위치에 배치 "
전원이 꺼진 상태에서 모니터를 적절한 그래픽 카드에 연결합니다.
iGPU(있는 경우). 그렇지 않은 경우
첫 번째 긴 PCI 슬롯에 있는 비 Vega GPU에 삽입합니다.
iGPU가 없고 Vega가 아닌 경우 첫 번째 긴 PCI 슬롯에 있는 Vega에 모니터를 연결합니다.
Vega 56과 Vega 64가 혼합되어 있는 경우 첫 번째 PCI 슬롯에 64를 권장합니다(중요하지 않음).
컴퓨터 부팅(새 하드웨어를 모두 감지하므로 느릴 수 있음)
(선택 사항) 만들기 "드라이버 없는 카드"라는 포인트(오래 걸리지 않음)
이 선택적 단계를 건너뛰지 마세요 🙂
5. 채굴 관련 윈도우 설정
전원 설정: 화면과 하드 드라이브를 절전 모드로 전환하지 않도록 설정
Windows 시작 버튼:"실행" 입력(또는 Windows 로고 키 + R 누르기)
유형:"powercfg.cpL"
선택한 요금제에 대해 "요금제 설정 변경" 선택
'디스플레이 끄기'를 '사용 안 함'으로 설정
'컴퓨터를 절전 모드로 전환'을 '사용 안 함'으로 설정
'고급 전원 설정 변경' 선택
"하드 디스크"를 확장하고 "다음 이후에 하드 디스크 끄기"를 "0"으로 설정
'적용', '확인', '변경 사항 저장'을 차례로 선택
창 닫기
(참고:하드 드라이브를 절전 모드로 설정하지 않으면 광부가 가상 메모리를 사용할 때 해시율 하락을 방지하는 데 도움이 되는 것으로 생각됩니다)
가상 메모리: Windows 가상 메모리 설정(에 대한 팁 ).
Windows 시작 버튼
유형:"고급 시스템 설정"
성능 설정
고급 탭
가상 메모리 –> 변경 버튼
'자동으로 관리' 선택 취소
사용자 지정 크기 전환:60000MB / 최대 크기:60000MB
"SET" 버튼을 누르십시오... (이 단계를 잊지 마세요... 여러 명이 있습니다!)
"확인" 누르기
큰 페이지 크기: 광부가 필요한 메모리에 액세스할 수 있도록 합니다.
gpedit.exe 열기
Windows 10 Education/enterprise 또는 Professional이 있는 경우:
Windows 시작 키 –> "gpedit"을 입력하고 Enter 키를 누릅니다.
Windows 10 Home(또는 Single Language Edition)이 있는 경우 gpedit이 있지만 비활성화되어 있으므로 활성화해야 합니다. 에 대한 팁 이 모든 작업을 수행할 bat 파일을 제공하는 사람입니다.
"방법 1:Windows 10 사용자만 해당"까지 아래로 스크롤합니다.
배트 파일을 다운로드하고 실행하려면 지침을 따르세요.
지침에 따라 컴퓨터를 다시 시작합니다.
Windows 시작 키 –> "gpedit.msc"를 입력하고 Enter 키를 누릅니다.
gpedit이 열린 상태:
"Windows 설정" 확장
'보안 설정' 확장
'로컬 정책' 확장
"사용자 권한 할당" 선택
오른쪽 화면에서 아래로 스크롤하여 "메모리의 페이지 잠금"을 선택합니다.
"사용자 또는 그룹 추가" 선택
Windows에 로그인할 때 사용하는 사용자 이름을 입력하고 "이름 확인"을 선택합니다.
이메일 주소인 경우 이름에 @domain.com 부분을 포함합니다.
작동이 확인되면 이름 아래에 밑줄이 표시됩니다.
“확인”을 누른 다음 기본 로컬 보안 정책 화면을 닫습니다. 채굴기를 실행하기 전에 컴퓨터를 다시 시작해야 하지만 지금 하지 마세요. 다시 시작은 나중에 자연스럽게 됩니다.
아래 그래픽은 방금 본 화면을 보여줍니다. 사진을 클릭하여 확대하고 유용한 크기로 만드십시오(검은 상자는 내 사용자 이름을 검게 칠한 곳입니다).
원격 데스크탑 소프트웨어(및 기타 지원 소프트웨어)
원격 데스크톱 소프트웨어 옵션을 설치 및 구성합니다. Google Chrome 원격 데스크톱은 사용하기 쉽고 다음과 같이 설정할 때 마이닝 중에 해시 드롭을 일으키지 않는다는 것을 확인할 수 있습니다.
설치 .
Chrome 하드웨어 가속 비활성화:
Google 크롬 설정 열기:“ "
설정 검색 필드에 "사용 가능한 경우 하드웨어 가속 사용"을 입력합니다.
슬라이더를 끄기로 전환합니다(채굴에 초점을 맞춘 GPU가 필요함)
"재실행" 버튼 선택
설치 확장자(컴퓨터에 대한 권한 부여)
원격 로그인을 연습하여 작동하는지 확인하는 것이 좋습니다.
참고:드라이버 설치 단계(나중에 진행) 후에는 컴퓨터를 자유롭게 종료할 수 있습니다. 모니터의 플러그를 뽑고 로 교체하세요. 그런 다음 나머지 모든 단계를 원격으로 로그인합니다.
선택적 조정
(선택 사항) 다운로드 및 설치 . 마이닝 중에 해시 드롭을 일으키지 않고 한 번에 하나 이상의 텍스트 파일을 열 수 있는 가볍고 사용자 친화적인 편집기입니다... 많은 텍스트 편집을 수행하게 될 것입니다.
(선택 사항) Windows 파일 탐색기 준비 파일 확장자를 변경하려면:
Windows 탐색기 열기(Windows 버튼 + E)
"보기" 탭, "옵션", "보기" 탭을 다시 선택한 다음:
'알려진 파일 형식의 확장명 숨기기' 옆에 있는 확인란을 선택 취소합니다. / 적용
"폴더에 적용" – "예" 선택
(선택 사항) Windows 자동 업데이트 비활성화 . 이 단계는 분명히 당신에게 달려 있습니다. 보안상의 이유로 때때로 설치해야 하지만 이제는 Windows가 경고 없이 광부를 중단(및 시스템 종료)할 수 있는 시간과 원하는 시간(주말일 수 있음)에 설치할 수 있습니다.
이를 수행하는 프로세스는 에 명확하게 정의되어 있습니다. . 링크로 이동하여 "옵션 3:그룹 정책 편집기" 섹션으로 스크롤합니다.
Windows Home 사용자는 이제 "gpedit.msc"가 있으므로 "이 파일을 따로 보관"할 필요가 없다는 것을 기억합니다. (Windows 버튼, "실행", "gpedit.msc" 입력)
또한 업데이트하기로 결정한 경우 Windows 업데이트가 있는 드라이버를 포함하지 않도록 Windows에 지시하는 기능을 활성화하십시오. ( )
(선택 사항) 자동 드라이버 업데이트 비활성화 . AMD가 새 드라이버를 내놓으면 괜찮을 수 있지만 계획되지 않은 드라이버 업데이트와 비교하여 자체 조건에 따라 시도해 보는 것이 좋습니다.
Windows 시작 버튼; 유형:"고급 시스템 설정 보기"
'하드웨어 탭'을 선택한 다음 '기기 설치 설정'을 선택합니다.
"아니요"로 전환하면 이미 작동 중일 때 Windows가 시스템을 변경하려고 시도하지 않습니다(화면의 일부 화면 캡처를 에 넣었습니다). 도움이 된다면 – 화면 캡처를 할 때 "예"가 여전히 토글되어 있음을 참고하세요.
6. GPU 드라이버 설치:
Vega가 아닌 카드가 있다면 지금 해당 드라이버를 설치하십시오(제 경우에는 GTX-750)
컴퓨터 다시 시작
다운로드 / 64비트 / 파일 이름은 8월 23일 릴리스를 나타냅니다.
권장사항: 4개 이상의 Vega가 있는 경우 이 단계에서 Vega에 외부 팬을 가리킬 것을 제안합니다. 드라이버 설치가 느리고 카드가 뜨거워질 수 있습니다. 드라이버가 팬 속도를 높이라고 알려주지 않기 때문입니다. 나는 AMD가 한 번에 2개 이상의 Vegas를 기대하도록 프로세스를 설계하지 않았다고 생각합니다. 제 경우에는 카드가 자체적으로 조절되어 설치가 실패했다고 생각합니다( ). 나는 선풍기를 사용하는 것이 현명해지기 전에 이것을 두 번 했다. 팬과 함께라면 문제가 없었습니다.
실행 파일을 실행하고 자동으로 추출되도록 합니다.
선택 메시지가 표시되면.
참고:시스템을 재구축하고 다른 소프트웨어 없이 AMD 드라이버만 설치한 이후로 해시 드롭 안정성이 향상되었습니다. 전체 AMD 애플리케이션을 설치하기로 선택한 경우 절대로 AMD 애플리케이션을 열지 마십시오. 다른 가이드에서 Wattman에 대한 언급을 듣게 될 것입니다. 그들을 무시하라. HBCC 슬라이더에 대한 참조를 듣게 될 것입니다. 그들을 무시하라. 드라이버 소프트웨어를 여는 것은 어떤 사람들에게는 효과가 있지만 드라이버를 열기 때문에 드라이버를 완전히 제거하고 다시 설치해야 했습니다. 하지마 드라이버가 설치되어 있어야 합니다.
AMD 디스플레이 드라이버 상자를 제외한 모든 상자의 선택을 취소합니다.
'설치'를 선택합니다(참고: 드라이버 설치 후 컴퓨터를 다시 시작하라는 메시지가 표시됩니다. 하지 마세요. 다시 시작하기 전에 수행해야 할 추가 단계가 있습니다.)
시스템에 Vega가 많으면 이 프로세스가 매우 느려지고 한 번에 몇 분 동안 화면이 검게 됩니다. 인내심을 갖고 카드를 시원하게 유지하십시오.
설치가 끝날 때 옵션이 표시되면 컴퓨터를 다시 시작하지 마십시오. 비활성화 크로스파이어 자동 링크 단계는 재부팅 전에 미리 수행하여 문제를 일으킬 기회가 없도록 제안했습니다...
AMD 크로스파이어 감지 끄기
Windows가 시작될 때마다 AMD 드라이버는 다른 Vega 카드를 감지하여 "를 설정합니다. ". 우리는 크로스 파이어를 원하지 않으며 검색하는 것조차 운전자의 안정성에 좋지 않습니다. 또한 마이닝 시 전원 상태에 대해 폴링이 표시되는 것을 원하지 않습니다. 다음은 "EnableUlps" 및 "EnableCrossFireAutoLink"를 비활성화하는 수동 단계입니다(나중에 다시 필요하므로 Vega 레지스트리 ID 번호를 기록해 두십시오)
Windows 시작 키 –> "regedit"
이 가이드에서 변경하라고 되어 있는 항목만 변경하도록 주의하십시오. 이 프로그램으로 인해 컴퓨터가 엉망이 될 수 있습니다.
아래 사진을 드릴다운하여(더 쉽게) 적절한 디렉토리로 이동하거나 다음을 통해 검색하고 Windows에서 찾도록 할 수 있습니다.
편집 선택 -> 찾기(Ctrl-F)
"EnableUlps"를 입력하고 '다음 찾기' 버튼(대소문자 구분)을 선택합니다.
검색하는 데 시간이 오래 걸릴 수 있습니다. 작동하도록 하세요.
검색 창은 결국 레지스트리로 이동하고 값이 1(true)인 "EnableUlps" 필드를 선택한 후 사라집니다. 필요한 경우 그림을 확장하려면 클릭하십시오.
기기 설명:"Raedon RX Vega"를 참고하세요.
카드의 등록 번호 ID를 기록해 둡니다. 위의 경우 "0001".
"EnableUlps"를 두 번 클릭하고 값을 "0"(거짓)으로 변경
"EnableCrossFireAutoLink"를 두 번 클릭하고 값을 "0"(거짓)으로 변경
Vega가 하나만 있으면 끝입니다. 하나 이상이면 왼쪽에 보이는 나머지 ID를 선택하고 다른 베가스를 찾아야 합니다. 제 경우 0000은 Nvidia이고 0001, 0002, 0003, 0004는 모두 Vega입니다.
각 Vega:
"EnableUlps"를 "0"으로 설정
"EnableCrossFireAutoLink"를 "0"으로 설정
기기 ID(예:0001)를 기록해 둡니다.
Vega64와 Vega56이 혼합되어 있는 경우 어떤 장치 ID가 어떤 종류의 카드에 연결되는지 알아야 합니다. "MatchingDeviceId" 필드로 스크롤하여 장치 ID가 Vega 64용인지 확인합니다("687f&rev_c1로 끝남). ") 또는 Vega 56("687f&rev_c3으로 끝남 ").
각 Vega의 기기 ID를 기록/기억해야 합니다.
레지스트리 표시 섹션 백업:오른쪽에서 상위 "{4d36e968-e325-11ce-bfc1-08002be10318}"를 마우스 오른쪽 버튼으로 클릭하고 "내보내기"를 선택합니다. 파일을 저장합니다.
참고:나중에 "소프트 파워 플레이 테이블"이라는 항목을 추가할 예정입니다. 컴퓨터에서 이러한 테이블이 마음에 들지 않으면 (1) 방금 저장한 이 파일을 두 번 클릭합니다. (2) "PP_PhmSoftPowerPlayTable"이라는 Vega 항목을 찾아서 삭제할 수 있습니다. (3) 컴퓨터를 다시 시작합니다… 소프트 파워 플레이 테이블을 적용한 적이 없습니다(이것이 "부드러운" 상태가 되는 이유입니다).
7. 장치 관리자로 Vega 드라이버 재설정
AMD 블록체인 드라이버는 불안정하며 이 트릭은 에서 배웠습니다. 문제를 해결합니다. 사람들은 Wattman HCBB 슬라이더를 통해 벗겨짐을 해결하라고 말할 것입니다. 하지마. AMD 드라이버 소프트웨어를 열지 마십시오. 이 작은 섹션에서는 스크립트를 사용하여 궁극적으로 자동으로 수행할 작업을 수동으로 수행하는 방법을 알려줍니다. (1) 스크립트가 수행하는 작업을 알고 (2) 시스템이 수동으로 작동하도록 하여 해싱에 집중하고 Vega 문제 해결에서 스크립트 문제 해결을 분리할 수 있도록 하는 것이 좋습니다.
Windows 시작 버튼
유형:"장치 관리자"
'디스플레이 어댑터' 확장
첫 번째 vega 선택, 마우스 오른쪽 버튼 클릭, 비활성화
Vega가 표시되지 않으면 기기 관리자를 닫고 표시될 때까지 다시 여세요.
첫 번째 Vega 선택, 마우스 오른쪽 버튼 클릭, 활성화
베가스 전체에서 반복
기기 관리자 닫기
참고:모니터/동글을 iGPU 또는 Nvidia에 연결하지 않은 경우 비활성화 및 활성화 기능 중에 화면이 검게 변할 수 있습니다. Vega가 이상하게 작동하면 이 프로세스를 반복해야 합니다(스크립트가 작동할 때까지). 이것은 쉽기 때문에 너무 생각하지 마십시오. 이 작업은 WINDOWS가 시작될 때마다 수행해야 하므로 . . 이제 그 스크립트가 무엇을 할 것인지 알 수 있습니다.
8. GPU 구성 소프트웨어 준비
다운로드 데스크탑으로 바로 이동(설치 필요 없음)
파일은 .z7로 압축되어 제공됩니다(를 사용할 수 있음). 압축 해제)
OverDriveNTool 실행 파일을 실행합니다.
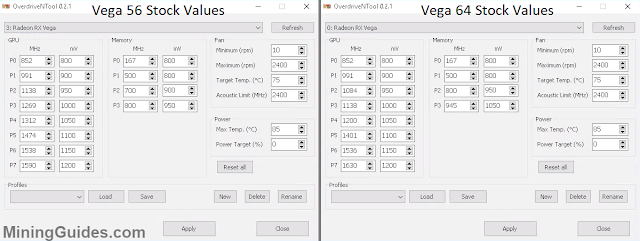
왼쪽 상단의 드롭다운 메뉴에서 첫 번째 Vega를 선택합니다. 다음과 같은 값의 화면을 제공하는지 확인합니다(숫자가 정확히 일치하지 않을 수 있으며 괜찮습니다).
<노인덱스>
참고:언제든지 이 메뉴에서 Vega를 선택할 때 OverDriveNTool에서 "이 GPU는 지원되지 않습니다"라는 메시지가 표시되면 슬프게도 이는 드라이버가 손상되었다는 신호이므로 다음을 수행해야 합니다. 이전 Windows 복원 지점 또는 (b) 블록체인 드라이버를 제거/재설치하고 레지스트리 편집을 반복합니다( 클릭). ).
Vega 56 또는 Vega 64가 모두 있는 경우 다음 단계로 건너뛸 수 있습니다. 나처럼 56과 64가 혼합되어 있는 경우 아래 단계에 따라 OverdriveNTool이 카드를 감지하는 순서를 결정하십시오(나중에 이 정보가 필요하므로 기록해 두십시오)
왼쪽 상단의 드롭다운을 사용하여 첫 번째 채소를 선택하세요.
GPU P7의 값을 살펴보세요.
1630이라고 표시되면 해당 슬롯 ID에 Vega 64가 있는 것입니다.
1590이라고 표시되면 해당 슬롯 ID에 Vega 56이 있는 것입니다.
각 Vega의 ID와 스타일을 식별하고 기록할 때까지 각 슬롯 ID를 순환합니다(제 경우에는 0=GTX750, 1-Vega64, 2-Vega56, 3-Vega56, 4-Vega64).
참고:이전 구성 시도를 통해 기본 GPU P7 값을 이미 변경한 경우 을 사용할 수 있습니다. 카드 순서를 결정합니다.
OverdriveNTool이 스크랩 프로필을 생성하여 .ini 파일을 생성하도록 합니다. 프로필에서 "저장"을 선택하고 이름을 "스크래치"로 지정합니다. –> GUI를 닫습니다.
텍스트 편집기를 사용하여 "OverdriveNTool.ini" 파일을 엽니다. 파일 내용을 삭제하고 아래 텍스트로 바꿉니다. 파일을 저장합니다.
참고:Liquid Cooled Vega가 있는 경우 Fan_Target=40을 설정해야 하며 그렇지 않으면 오류가 발생합니다.
참고:저는 올해가 시작되기 직전부터 새로운 .ini 매개변수 세트를 테스트(및 Reddit/채팅/다이렉트 메시지를 통해 많은 사람들과 공유)해 왔습니다... 요점은, 약 3주 동안 테스트했으며 제가 더 나은 안정성을 보았고 나쁜 영향이 없음을 알고 있습니다. 오늘(2018년 1월 17일)부터 가이드 표준으로 만들고 있습니다. OverdriveNTool은 GPU_P0을 P5로, Mem_P0을 Mem_P2로 조정할 수 없지만 비활성화할 수 있으며 이것이 이 새 파일이 하는 일입니다. 이는 채굴에 적합하지만 전용 채굴기가 없는 경우 채굴을 하지 않을 때도 GPU가 더 높은 전력의 P 상태에서 계속 작동한다는 점에 유의하십시오. (이를 다시 활성화하는 프로필을 호출하는 별도의 박쥐 파일로 쉽게 활성화할 수 있음)
참고:OverdriveNTool GUI 및 .ini는 많은 값을 제어하는 것처럼 보이지만 이 중 대부분은 실제로 Windows 레지스트리에 의해 제어되며 OverdriveNTool을 통해 구성할 수 없습니다. GPU_P6, GPU_P7, Mem_P3, 팬 및 전원 대상 . 다른 낮은 수준의 P 상태를 변경하려면 레지스트리 편집이 필요합니다(나중에 할 예정).
참고:이러한 프로필은 전력 최적화를 희생하면서 안정적인 시작점을 제공합니다. 일단 실행되면 하고 싶을 것입니다. GPU_P6, P7 및 Mem_P3 값을 사용하여 동일한 해시 비율에 대해 더 낮은 전력 소비를 얻을 수 있습니다. 수정할 수 있는 안전한 기반이 있는지 확인하려면 잠시만 기다려 주세요.
바탕 화면에 "Run_OverdriveNTool.bat"라는 새 파일을 만들고 실행하면 OverdriveNTool.exe를 호출하고 (1) 각 Vega에서 설정을 지우고 (2) 각각에 대해 원하는 설정을 지정합니다. 이전 단계에서 만든 .ini 파일에 대한 Vega.
텍스트 편집기 열기
"파일" -> "파일 형식:"을 선택하고 "모든 파일"을 선택합니다. 파일 이름을 'Run_OverdriveNTool.bat'로 지정하세요.
.bat 파일에는 다음과 같은 형식의 텍스트가 한 줄 있습니다.OverdriveNTool.exe -r1 -r2 -r3 -r4 -p1Vega64 -p2Vega56 -p3Vega56 -p4Vega64
참고: 파일은 설정에 맞게 구성되어야 합니다. The provided text is for my specific configuration of cards. You need a “-r#” for each of the card ID’s that needs to be reset, and then a -p# to reset parameters for either a Vega 56 or Vega 64 parameter as required by your setup.
Your computer will be unhappy if you start mining on a Vega 56 that has the Vega 64 OverdriveNTool profile applied to it. See the if you are still unsure of your OverdriveNTool card order.
Note also: “-r0” in my case is my GTX-750 so I have no command with “-r0” or “-p0”. Your setup may differ. Good luck :-). If you open the OverDriveNTool.exe GUI you will see a menu that lists each of your cards in order.
Double Click your “Run_OverdriveNTool.bat” file. You will see a black screen flash up and disappear.
Confirm that your bat file worked for each card:
If you are by your machine you can just confirm that the fan of each Vega is now spinning fast (you just set the minimum to 3000RPM)
If you are remote from your system; Double Click on “OveredriveNTool.exe” to open the GUI. Cycle through your cards. Ignore most of the numbers for now as they will not yet take… you know the .bat file worked if the “Fan_Min” is set to 3000rpm for each card. (don’t expect all the other numbers to match yet)
9. Prep Vegas with Soft Power Play Tables
In this section we will tweak the Windows registry to optimize power consumption performance of the Vega’s. It’s called “Soft” because this section does not alter your Vega’s (unless you elect to flash the BIOS).
established himself as the community expert in soft power play tables via Sept 21st post on overclock.net. For some time I have linked people to his Oct 5th . His original post gets a major hat tip from me as it was very helpful in getting me started. Unfortunately, when I was starting, there were too many “follow the guide except do this instead” cases such that having a new consolidated guide was needed. In my guide I have always sent people there for a few steps so they can recognize his contribution. Sometime around Nov 29th he did an extensive re-write of his post. Sorry for the back and forth but he now makes you pay for his content via coinhive links and it seems dishonorable for me to post any scripts here that he has not previously posted for free (sorry).
Go to u/Hellea’s
Note:I have not flashed my Vega 56 BIOS to Vega 64 BIOS and do not plan to as I am aware of no benefit.
Scroll down to the section called:“Soft Power Play tables at Windows Registry”
SKIP STEP 1
Watch the video that is in Step 2 if you choose (punchline is that OverdrivNTool does not control P states below GPU_P6, and MEM_P3… even though they show up as editable in the GUI. Soft Power Play tables are required to actually change those values.)
SKIP STEPS 4, 5, 6 (we already installed the driver)
Perform Step 7
Note: I have used the power play table (that u/Hellea previously posted for free) on both my stock bios 56’s and 64’s. I have had no issues but every Vega is a little different and it won’t work for everyone.
Per request, I used have used ‘s Excel tool to produce a Stock Vega 56 registry file ( ). I have tested that it works but it did increase my power usage by about 10 watts vs. the file above.
I have not used the “Safe” file that u/Hellea now links to on his post… but I have no reason to doubt it is safe.
SKIP STEP 1 (You already know your Vega Registry ID’s)
Perform Step 2 through 4
Note:If a reboot after applying the SoftPowerPlay Table causes your computer to BSOD, don’t panic… .
Come back to this guide, we are done with that one for now. (but you will want to revisit it once you are up and running and ready to )
Perform the steps in “ ” listed above.
Remember, this needs to be done every time Windows restarts
Double Click the “Run_OverDriveNTool.bat” file we made earlier.
Congratulations… If you had a miner you would be ready to get mining.
10. Install the Miner – XMR-Stak
Create an “xmr-stak” directory on C drive, ‘c:\xmr-stak’ (or location of your choice)
In Windows defender, set XMR-stak directory as an exception
Windows Start –> Type:“Windows Defender Security Center”
Select “Virus &threat protection”
Select:“Virus &threat protection settings”
Select:“Add or remove exclusions” under the “Exclusions” section
Select the plus sign by, “Add an exclusion”, “Folder” and select folder, “XMR-Stak”.
Select your miner. I recommend (There is also a valid option to use as your Vega GPU miner). I use and will outline step-by-step setup of XMR-STAK because:
It gives the same performance ( – YMMV)
Includes a really handy web interface so I can check my hashrate/connection from any computer on my LAN
It is compatible with JJs_HashMonitor which we will discuss later (that last reason is the best reason of all!)
Download (you want the file called:“xmr-stak-win64.zip”)
Chrome will call any miner malware and prevent the download. The xmr_stak code is not bad but so many people are using miners as malware so the browser assumes you are not aware of what your doing. Here are instructions on how to do this if you need them…
Click the link and let Chrome prevent the download.
Hit “Ctrl-J” to open the chrome download manager
XMR-Stak will be the top file:Select, “Keep Dangerous File”
Extract the zip file to the c:\xmr-stak\ directory you created previously.
Give the xmr_stak.exe file administrative privileges so it has the right to control efficient blocks of memory for fast mining (the “large page sizes” ).
Right click on the file and select “properties”
Select the “Compatibility” tab and tic box for:“Run this program as an administrator”
You may need two libraries (msvcp140.dll and vcruntime140.dll) which are available from the Microsoft server (do NOT use a random internet download of .dll files).
The needed files will install as part of VC_redist.x64.exe. The 64 bit version is here if you need them (small installation):
11. Get Ready to Mine
Note:Vegas are really good at mining the CryptoNight algorithm and can be effective mining a number of coins; Monero (XMR), ETN, ITNS, SUMO, KRB, XLC, Nicehash CryptoNight to name a few. You can skip this section if you are familiar with mining and already have a coin address and target pool. This section will set you up mining Monero with a stable pool as a stable baseline. Once you are up and running you will want to explore different coin options and it is easy to switch between CryptoNight Coins.
Get a Monero address if you don’t have one.
The official getmonero.org site provides some wallet options .
MoneroMoo is a trusted Monero developer and provides the easiest way to get an address via this downloadable wallet generator ( ).
A hosted version of the MoneroMoo wallet generator is located here ( )…. but it is better if you download the github file.
Enter a value of your choice into the “Custom entropy” field.
Select:“Generate Wallet”
Print or in some way save this very valuable and unique information. Never share the Mnemonic seed or spend key. The “Public address” can be made public (thus the clever name) and will be needed in the next section so your mining pool knows where to send the mining profit.
Select a mining pool
A list of available pools can be found here: /
I use and highly recommend . They have an active chat group that is very helpful. They have always paid me out the amount that they should exactly when they should. The two that run the place, @Snipa22 and @m5m400, are accessible via chat if you ever need any assistance. Of course as always, YMMV and you are free to do as you please.
This guide will assume you select supportXMR and will use pool.supportxmr.com:7777 as the assumed pool address when setting up the miner. You can fill in whichever you picked.
12. Configure the Miner – XMR-Stak
Assuming you have already since your last windows restart… Double click and run, xmr-stak.exe.
Windows will block execution to “Protect your PC”. Select, “More info” and then “Run anyway”
It will ask if you want to use the HTTP interface. You do!
Enter the number:420 (easy to change later)
It will ask you to enter the currency you want to mine. Enter:‘monero7’
Note:“monero7” is specific to monero, if you use an alt-coin you will likely need “cryptonight”
It will ask for your pool address. Enter:pool.supportxmr.com:7777
It will ask for your user name:Enter your public wallet address
It will ask for your password. This is not really a password. It is an identifier unique to your computer so that:
1) If you have multiple computers working, you can see how much this one is contributing toward your total hashrate
2) If you include an e-mail address, supportXMR will send you an e-mail if your computer stops hashing (this is really handy if windows ever makes a random update/restart and you would be otherwise unaware).
Enter your choice in format:“ComputerName:[email protected]” (don’t enter actual quotes)
It will ask for your “Rig identifier”. This is not supported by most pools yet so just hit ‘enter’
It will ask if your pool supports TLS/SSL. SupportXMR actually does support TLS/SSL (and you should consider using it..) BUT, this may require more configuration for your machine so say ‘N’ for now to limit the variables you are messing with (it’s easy to change later).
It will ask if you want to use Nicehash:Enter ‘n’ for No.
It will ask if you want to use multiple pools:Enter ‘n’ for No (easy to change later)
You made your first hash. Yea. Now close the miner :-).
If you saw messages about “precompiled cod” not being found that is OK and expected.
If you type ‘h’ in the screen before closing you will see your hash rate report. It will be nowhere near the rate you want… don’t panic
It generated several files:config.txt, pools.txt, cpu.txt, amd.txt, maybe a nvidia.txt (depends if you have a Nvidia card or not). Each file needs to be optimized. The tuning guide is but I will get you started with a few things.
Skip this step unless you did not enter a port address during the previous step… or if you entered the wrong port number. Open Config.txt
Open Config.txt
Scroll down to the bottom where is says:“httpd_port” :0,
Change the 0 to a number of your choosing (i.e. 420)
When the miner is running you can now check your hash rate from your browser with address:http://localhost:420/h (where 420 is whatever number you picked)
If you know your computers i.p address, you can do it from any computer (or phone) on your LAN using:http://IPaddress:420/h
That last step is important. As you will see later, set a port number even if you don’t think you will use the web interface much.
Save and close.
Open cpu.txt
At the bottom you will see something like (its specific to your CPU):“cpu_threads_conf” :[ { “low_power_mode” :false, “no_prefetch” :true, “affine_to_cpu” :0 }, { “low_power_mode” :false, “no_prefetch” :true, “affine_to_cpu” :2 }, { “low_power_mode” :false, “no_prefetch” :true, “affine_to_cpu” :4 }, ]
Optimizing your CPU is beyond the scope of this guide. The key for this step it to pick which CPU will be reserved to instruct the GPU’s.
If your CPU “hyperthreads” then you will see missing numbers (“1”, “3” and “5” are missing in example above). Note a missing number (we will use “1”) and exit the file without editing it.
If your CPU does not “hyperthread” then there will be no missing number. If that is the case, you will want to reserve one core for your GPU. Pick a number (say “0”) and type “//” (without quotes) in the front of the line and then save &exit.
Open amd.txt (this is where the Vega optimization magic will happen)
You will see something like the box below but there will be an index number and bracket pair { } for each Vega in your system (the example below is for a hypothetical two Vega system):“gpu_threads_conf” :[ // gpu:gfx901 memory:3920 // compute units:64 { “index” :0, “intensity” :1536, “worksize” :8, “affine_to_cpu” :false, “strided_index” :1, “mem_chunk” :2, “comp_mode” :true }, // gpu:gfx901 memory:3920 // compute units:64 { “index” :1, “intensity” :1536, “worksize” :8, “affine_to_cpu” :false, “strided_index” :1, “mem_chunk” :2, “comp_mode” :true }, ],
Vega’s are special and can handle two threads for each index, each with a very high intensity. Each card was given an index number. For each Vega, delete the complete auto-generated bracket pair { } and replace it with the double line of text in the block below (The example text below is for a hypothetical two Vega system)
The intensity and worksize values are the same whether Vega 56 or 64.
You need two lines for each Vega so ensure you update the index for each pair.
You will need to update the “affine_to_cpu” number to be whichever CPU number you selected in the “cpu.txt” section above (“1” in our example).
You use the same affine_to_cpu number for each Vega, no matter how many you have. (if you have have an Nvidia.txt file it should be modified to use that same affine_to_cpu number as well)
WARNING: Hopefully you are using an iGPU or non-Vega GPU to serve your HDMI dongle (or monitor). If you must have your monitor/dongle plugged into a Vega then that index pair needs to have a lower intensity then what is shown below. Use 1800 for both threads of the Vega that must serve a dongle/monitor. Only the index that serves the monitor has to be reduced. Don’t stress, it will cost you only about 2h/s total on a Vega 64. You will know you need this if your screen while mining.
To mine, you do the following every time you start the computer.
(you do not need a fresh windows boot every time)
Use the device manager to disable and re-enable each Vega (as defined in this section above)
Double click the “Run_OverDriveNTool.bat” file you created.
Double click the xmr-stak.exe executable
Windows may ask to allow the program access to your network… of course mining requires the internet so answer yes.
Your mining!
If your not mining… read back over the guide and ensure you did not miss a step. Many many people have affirmed that guide works so be optimistic… you’re almost there. If that does not reveal the problem, visit the FAQ
VIEW YOUR STATS
Now that your mining I will show you how to check your miner statistics from another computer using the XMR-Stak web interface.
If you don’t know it already, find your computers local IP address
Open command prompt (windows key –> “cmd”)
Type “ipconfig”
Look for the line that says:“IPv4 Address. . . . . . . . . . . :192.168.xxx.yyy”
The following steps can be done from your mining computer but it is better, if you are able, to do this from another computer so you do not disturb your miner.
Open a web browser on a computer connected to your Local Area Network (LAN)
Type your IP address, a colon, and your XMR-stak port number into the address bar
:(i.e. 192.168.1.10:480 )
Woot! You can watch your money being made 🙂
The main screen shows your hash rate (this screen capture of my now updated rig with Nvidia replaced with a Vega). There is also a results screen and a connection screen.
<노인덱스>
When I start my miner I just remote in using remote desktop, use the script you are about to install below, and then log out of remote desktop while the Vegas are just starting to reset. I then do all my system monitoring from a different computer via this interface
If you know how to log into your router you can also forward the port that you are using for XMR-Stak. Then, if you know your public IP address ( ) then you can use the same method to check your miner from your phone wherever you have internet access. (be careful… it can be addicting;-).
(Ok, that works and is doable but can’t this be simplified with a script? Yes… keep reading)
14. Auto Start Miner with Hash Monitor
If you have spent any time mining with Vega’s you know the drivers are flaky and can be prone to “hash drop”. That means they can be running at full speed for a few hours or days and then BAM! For seemingly no reason they throttle down to 1600h/s and you are loosing 20% of your output until you check on your system and catch the problem. This is a HUGE frustration and can make mining with Vega’s really high maintenance. @TheJerichoJones has developed a program to manage the madness. The program, “JJ’s Precious Guardian”, is a one shot method to starting your miner. It does all the things we did previously:
Disable Vega’s,
Enable Vega’s,
call OverdriveNTool,
and start xmr-stak….
but it ALSO monitors and manages the hash drop problem. Precious Guardian detects when hash drop has happened and automatically restarts the Vega’s back up to full speed. Vega mining with 56’s and 64’s is can be the fire-and-forget miner you expected it to be. The hash monitor REQUIRES that you are using xmr-stak (as we installed above). Keep in mind you ALREADY have a functioning miner. This step is totally worth it but is not required. Note:While his original program was to be supported by donations… they were extremely rare so he has now designed Precious Guardian to mine for himself (TheJerichoJones) for the first 5 minutes after every restart. This equates to about 1 cent for a Vega restart. Even though I actually contributed with the initial concept of the program, I personally have no issue paying him this fee on my two miners because it is (a) really small and (b) because I want him to stay engaged to offer bug fixes and updates. My systems (and hopefully yours) are pretty stable so it costs a trivial amount to use the program… and when it does kick in, that means I hash dropped and thus I find it totally worth it. YMMV. If you are not interested in hash monitoring, TheJerichoJones provides a free script that will reset the Vega’s and start the miner but does not monitor for hash drop.
DOWNLOAD AND CONFIGURE JJ’s PRECIOUS GUARDIAN
download “Precious Guardian”
If using XMR-stak or higher:Click .
If using XMR-stak version 2.3 or higher:Click .
Unzip contents INTO THE DIRECTORY that contains XMR_Stak.exe, OverdriveNTool.exe and OverdriveNTool.ini
(Windows 7 users only:I am told you need Management Framework 3.0 which can be downloaded from Microsoft )
Open PreciousGuardian_Config.txt to edit three parameters
(1) Scroll down a few lines until you see:
_httpd_port=”420″ (roughly line 14)
Change the number (“420”) to be the same port number you used in xmr-stak config.txt
(2) Scroll down ~10 lines and find the line that says:
_hdiff =“300” (roughly line 25)
This is your hash drop trigger (in h/s). Change the number as you desire. I recommend you change the trigger to at least 100h/s for each Vega in your system. If CPU mining is also being performed your hash rate may fluctuate a little when you use your computer so you might want a little more margin.
Note:A Vega hash drop looses ~300h/s per Vega
(3) The program would technically work now but we want it to call OverdriveNTool every time the Vega’s reset. Scroll way down to the Video Tools management section and find the line that says:
#_vidTool=“OverdriveNTool.exe -r1 -p1Vega64” (roughly line 125)
(a) Remove the pound sign (#) from the front of the line
(b) Replace the value in quotes with the contents of your Run_OverDriveNTool.bat file. In my case:
Save and close. (you can come back later and setup email / text / or Slack Channel alerts to let you know when hash drop is detected)
START MONITORED MINING
Your set. Double click PreciousGuardian.exe and you are mining!
The very first time will receive a windows warning because an “unsigned program” is trying to run. Select “More info” and then “Run Anyway”
As mentioned before, the monitor will mine for the developer (TheJerichoJones) for 5 minutes and then restart and mine for you indefinitely (there is no back and forth). That first restart is per the programs design.
(optional) Right click on “PreciousGuardian.exe” and select, “create shortcut”.
(optional) Rename the shortcut (i.e. “Start Miner”) and move it to your desktop.
WARNING/DISCLAIMER:In addition to the bogus throttling that Vega’s will do because of flaky drivers, there is also a legitimate reason to throttle. Vega’s will legitimately throttle themselves if the memory on the cards (HBM) get’s too hot. In such a case, the throttling was actually good because it protected your cards. That should not be the case for you because we used OverdriveNTool to set the min fan speed to 3000rpm which should keep things nice and cool. That said, USE THIS SCRIPT AT YOUR OWN RISK. Restarts should be rare. If you start getting back to back restarts, you need to get involved.
15. Set Windows to Auto Start Miner at Login
If you are at this point in the guide then hopefully your rig is stable and mining effectively. This entire section is an optional bonus for those that want their miners to start automatically when the computer boots up. Hopefully it goes without saying that performing this step means that anyone can access your computer by simply powering it up. Because it is a dedicated miner, you were already running it 24/7 in an unlocked state so this is really not much of a change. This computer will obviously contain your public coin addresses as they are required for mining (config.txt file)… but this is a non-issue as they are public addresses anyway. HOWEVER, this section does provide an opportunity to remind you never to store your view or spend keys on your unlocked mining computer.
Set you BIOS to auto-start when power is applied:
Most modern boards have a Bios setting that will have your computer auto start when power is applied (i.e. when power returns after a power outage). This auto-start sollution will be most effective if you go into the BIOS and select that setting. It is beyond the scope of this guide to get into the details of your particular motherboard but… good luck.
Install Windows AutoLogin Utility:
Download the AutoLogin application from the Microsoft Server (You will be giving this application your login password which is why I emphasize it originates from the Microsoft server ) – hat tip to TheJerichoJones for pointing me to this utility
Go to:
Click the link that says, “Download Autologon”
Un-compress the Zip file
Install the small utility and log in with your credentials (they are stored encrypted)
Create a Scheduled task to start the miner at login
Windows Start button:Type:“Task Scheduler”
Select “Action” –> “Create Task”
On the “General” tab:
Enter a name:“Start Miner” (or name of your choice)
Select check box, “Run with highest privileges”
Select the “Triggers” tab:
Select “New”
In the “Begin the task:” drop-down, select, “At log on”
If it takes your network a while to restart after a power outage, you may want to enter a value in the “Delay task for” field.
Select “OK”
Select the “Actions” tab
Select “New”
“Action” will already be set to, “Start a program”
Select “Browse” and select your “PreciousGuardian.exe” file
While you are in that browse window you may want to copy the directory path that your files are in as you will be needing it in the next step…
The “Start in (optional):” field is not optional. You need to enter the path to the directory that contains PreciousGuardian.exe
Select “OK”
(Optional) Select the “Conditions” tab
At the bottom, toggle the option to, “Start only if the following network connection is available” –> “Any connection”
Select the “OK” button and return to the Task Scheduler screen
(Optional) While in Task Scheduler, you may want to select “Task Scheduler Library” in the left hand column and ensure you understand and approve of all the scheduled tasks. Make sure they are appropriate for your dedicated (hopefully stable) miner.
Close the Task Scheduler Window.
Done! Now when you restart your computer it should automatically log into your profile and start your miner 🙂
보너스: Some people (like me) do everything remotely and even use a remote power control (like the in my case) to allow remote hard reset of the system. Power outages whether natural or forced with something like a can sometimes cause Windows to start into an ‘Error Recovery Screen’ which wants a user input BEFORE it has gotten to the stage where you can remote in and provide such input. Take the following steps to prevent the windows error recovery screen (hat tip: ):
Windows Start button:Type:“cmd” (do NOT hit enter)
Right click on “Command Prompt” and select “run as administrator”
Type:“bcdedit /set bootstatuspolicy ignoreallfailures” (without the quotes)
Done. Every time windows powers down is should start normally.
I Hope This Helped !
I really hope this helped get you on your way to mining with Vegas.
If this helped you then please help spread the word that it works. I wrote the guide to help people out and I get a kick out of watching the page view count go up 🙂
Remember, this is a consolidated guide and much of the content did not originate with me. The originators I pulled from have all been attributed and should not be forgotten.
I had originally intended not to post a donation address, but I am spending a LOT of time answering questions and maintaining this as a consolidated guide to mining with Vega’s. I love knowing how many people this guide has helped and enjoy offering it as a free online resource. That will never change. But, some might be in a position to give back and CircusWife and I would really appreciate it if those who can afford it would send what they can as a show of support. Honestly, be a hero, they don’t come often.